
Berry Cheesecake Brioche Buns
I wasn’t sure what to call these buns. From my research, they appear to be very similar to a Czech Kolache or a Russian Vatrushka, however I have had neither. So I decided to call them cheesecake brioche buns, but they indeed were inspired by and I learned about the shaping from either/both. It just felt a little disingenuous to call them either because I don’t know how faithful they are to the original. I also didn’t set out to make kolaches or vatrushkas, I wanted a pastry like a danish but with bread.
These actually took me several recipe tests to get right. They taste great but they kept puffing up too much and the filling would puff up with the center and spill everywhere. While they tasted wonderful they looked atrocious. Looks aren’t everything, but I knew I was doing SOMETHING wrong because I have seen results of what I wanted. I finally settled on one that still puffed up but decidedly less so than the first several attempts.

I took my Super Soft Brioche Dinner Rolls, modified the recipe a little bit and created these berry cheesecake brioche buns. I have a few other ideas for fillings on these, so if you enjoy these be sure to check back because I will probably add some variations.
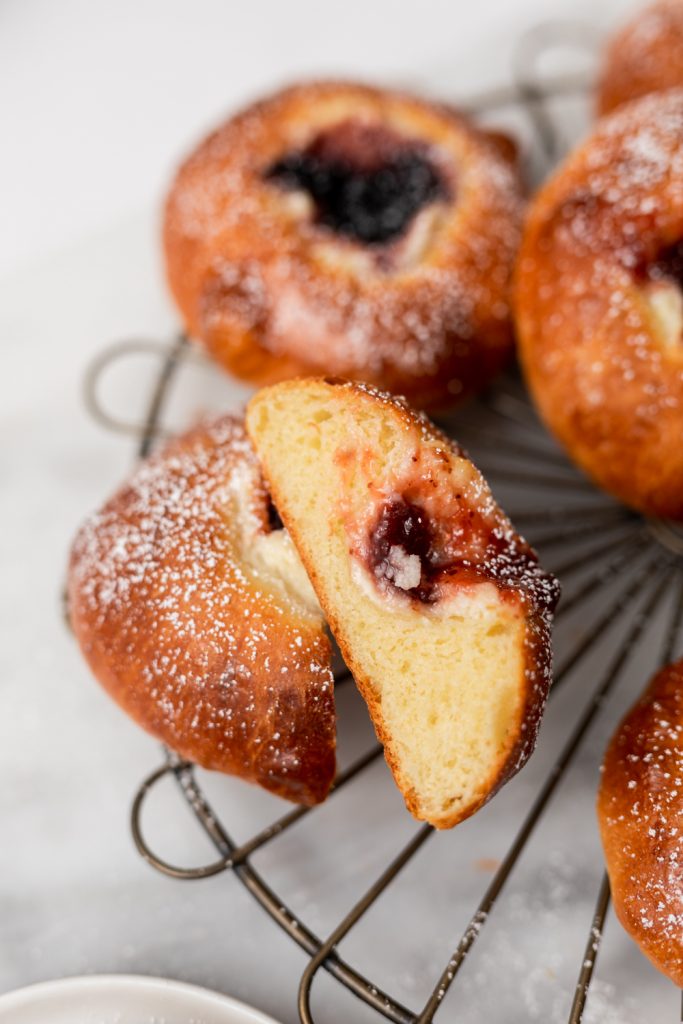
These taste super buttery and rich and almost like a danish, but softer and fluffier. I think they would and could be easily enjoyed for breakfast or dessert.
Baking Tips
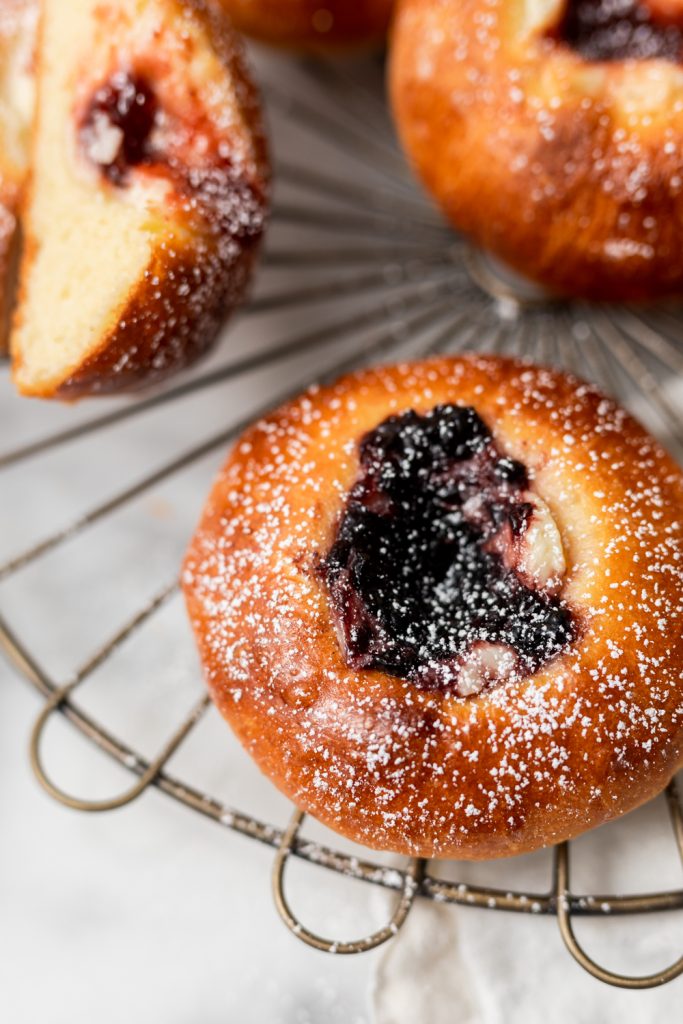
I tested these with all kinds of jams and preserves. Whatever flavor you like best is what you should use, but my personal favorite was blackberry.
The dough is going to be sticky but also sort of velvety and slick feeling due to the high butter content. As long as it’s been properly kneaded (it should pass the windowpane test and be very stretchy) it’s okay that it’s still sticking to the bowl. When shaping the dough make sure to flour your workspace and all will turn out well.
When shaping your wells in the dough, don’t be afraid to press down into the dough. You want the center indentation to be firmly pushed down to prevent it from just popping back up. That being said, if this does happen during baking, your buns will still taste wonderful, they will just be slightly off in appearance.
Berry Cheesecake Brioche Buns Key Ingredients
- Eggs – This is one of the key ingredients when you’re making brioche. Brioche has tons of butter and egg to enrich the dough. All the fats give the bread lots of flavor and create a very tender crumb.
- Butter – Just like eggs, these cheesecake brioche buns don’t skimp on the butter either. It feels like a lot. It IS a lot, but it’s how you achieve the correct texture of the bread. If you leave them out or cut back it will not be the same.
- Cream Cheese – Along with jam, cream cheese is going to give us our cheesecake filling just like you would use in making an actual cheesecake.
This page contains affiliate links for products I use and love. If you choose to purchase directly from clicking a link, I may earn a small commission, however I am not being paid to link to these items.

Ingredients
- 420 g AP flour 3½ cup
- 7 g Instant yeast 2¼ tsp
- 6 g Sea salt 1 tsp
- 70 g Granulated sugar ⅓ cup
- 2 large Whole eggs + 2 yolks room temperature, reserve egg whites
- 180 g Whole or 2% Milk ¾ cup, room temperature
- 112 g Unsalted butter ½ cup, room temperature
Filling
- 6 oz Cream Cheese softened
- 65 g Powdered sugar ½ cup
- ½ tsp Vanilla
- ⅓ cup Jam/Preserves
Topping
- Powdered sugar for dusting
Instructions
- In the bowl of your stand mixer with dough hook attached, add flour, salt, sugar, yeast, 2 eggs plus 2 yolks and milk. Mix on low until a rough dough comes together.
- Cut your room temperature butter into about 5 equal pieces, and with the mixer running on low, add the butter chunks one at a time. Do not add the next piece until the previous has been thoroughly mixed into the dough. Repeat until all butter is incorporated in.
- Mix dough until smooth, and passes the window pane test. As this is a very enriched dough, kneading could take anywhere from 15-30 minutes. I leave my mixer going and check on the dough every 7-10 minutes.
- When the dough is ready, it will still be sticky but also a little slick from the large amount of butter. Place into a very lightly greased bowl, cover and allow to rise in a warm place for 90-120 minutes.
- Line two baking sheets with parchment and set aside.
- When your dough is ready, punch down and transfer a floured work space.
- Using a knife or a bench scraper, divide your dough into 12 equal portions. Use a scale if you would like very evenly sized dough portions. For me, it came out to about 73g per dough ball. Cover the dough while you work on shaping each piece.
- Taking one piece of the dough, place in your palm and take the edges of the dough, folding them in towards the center. Once you have pulled all the sides in, pinch the center together and place the dough ball, seam side down, onto the your prepared baking sheet. Place 6 buns on each sheet. Repeat steps with remaining dough.
- Cover your baking pan with your shaped buns and allow to rise for another 45-90 minutes in a warm place. Rolls are sufficiently proofed when they have puffed up considerably.
- Preheat your oven to 375°F
- In a medium size bowl, add your cream cheese, powdered sugar, and vanilla and mix for about one minute, until creamy and smooth.
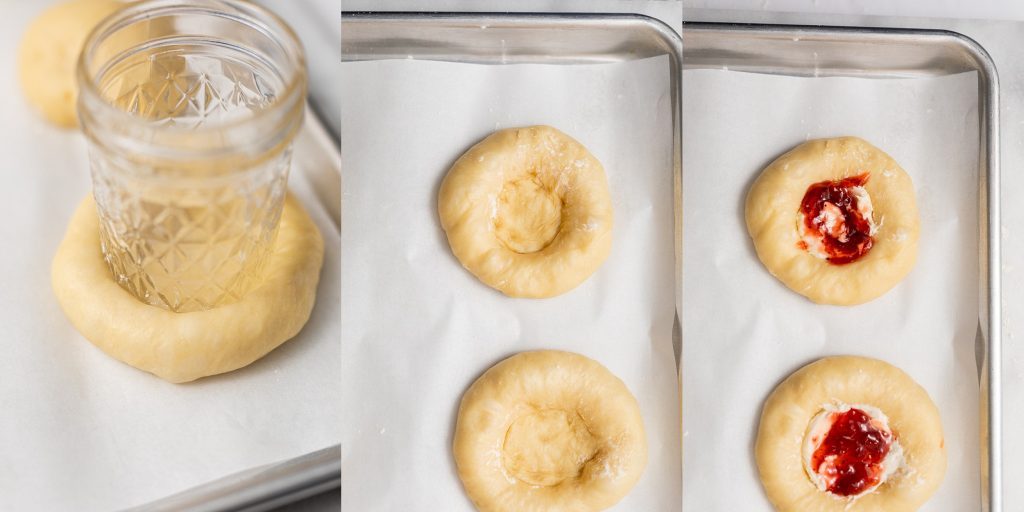
- Flour the bottom of a small cup or mason jar that is about 2¼ inches wide at the bottom. Press into the center of each bun creating a well in the center.
- Fill each well with about 1½ tbsp of the cream cheese mixture and about 1 tsp of jam. Repeat with all buns.
- Take the egg whites you reserved and brush the edges of your buns.
- Place your baking pan on the center rack of your oven and bake your rolls for about 20 minutes. If you have to use two racks, switch the sheet pans half way through the bake. The bread will be a darker golden brown color when they are ready.
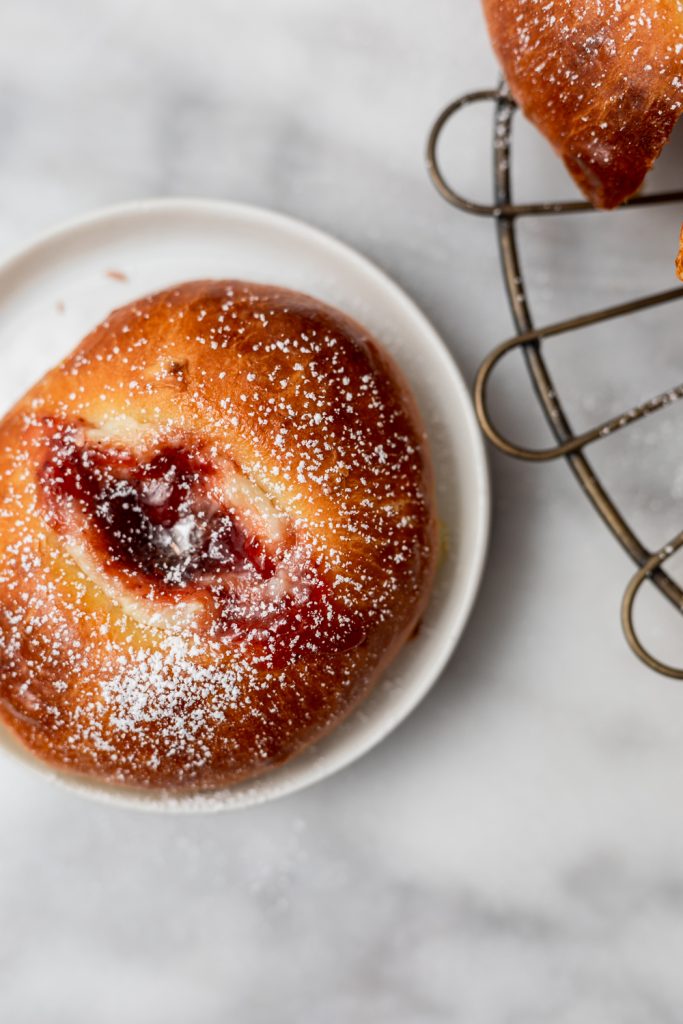
- Remove from the oven and allow bread to cool for at least 20 minutes before enjoying. Lightly dust with powdered sugar before serving. Store in an airtight container.


amzing flavor, great and fluffy
Joan, thank you for making these and I’m so happy you enjoyed them!
Looking forward to trying these brioche buns! Quick question… Prior to baking, can these be frozen either fully assembled or just the shaped buns with or without the filling(s)?
Hi Netty, so I haven’t tried freezing this recipe yet, however it should be able to be frozen before baking. I would shape them, and then put the sheet pan in the freezer before the second rise/doing the filling. Then when you want to bake, I’d let them defrost in the refrigerator overnight, and then bring them out on the counter to proof that second proof. It will probably be maybe closer to 3-4 hours rather than the 45-90 minutes, depending on how warm your kitchen (or wherever they sit to proof) is just because the dough will be starting off cold. But after they have puffed up, then just pick the recipe back up!