
Tender Braided Challah
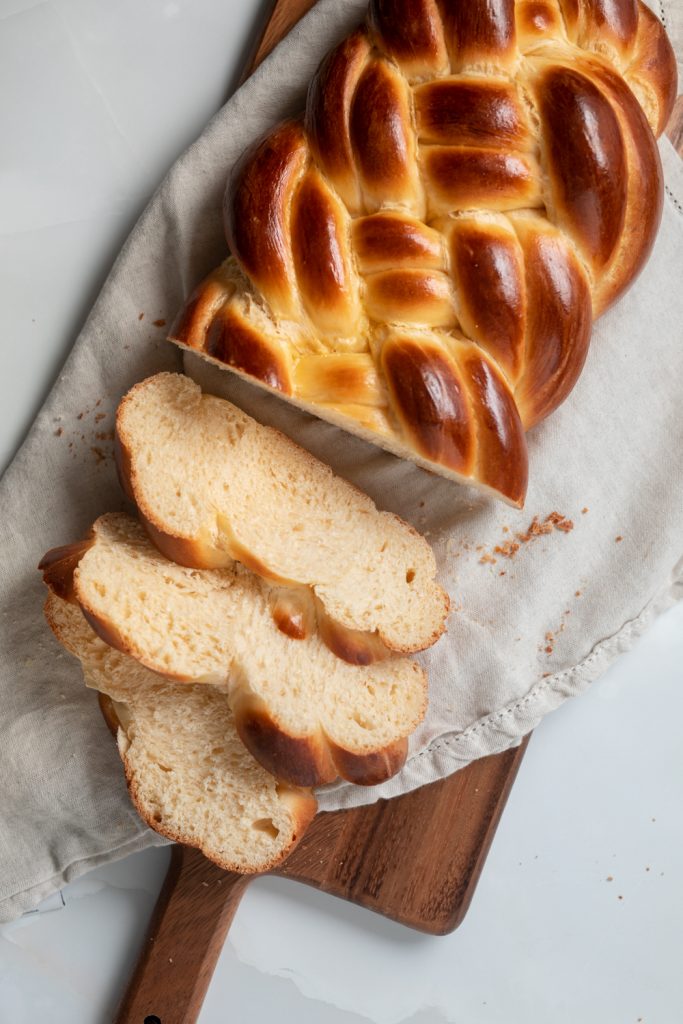
This braided challah bread is my take on the classic Jewish bread. Soft, lightly sweet, and made for celebrations. Similar to brioche it is an enriched dough, that can be considered kosher as it is without dairy or meat.
I am not Jewish. I am simply a bread enthusiast who enjoys this bread, and also someone who enjoys learning about and trying foods from other cultures. Understanding why different people or places eat certain foods is interesting, but just trying foods that you haven’t been exposed to is a great way to experience new ingredients or new ways of cooking/baking. I wanted to write a challah recipe that is traditional (but made by a gentile), perhaps for people like me who have never been exposed to other culture’s food and help share both the bread and hopefully a curiosity or respect for a food or a way of life different than our own.
Challah (pronounced like hallah/holla) is a traditional Jewish bread that is baked and eaten on special holidays like Rosh Hashanah but also on the sabbath which is referred to as Shabbat. Festivities begin with a blessing over the meal which includes bread – usually braided challah loaves. Historically, a piece of the bread is ripped off and set aside and prayed over as an offering. Different braids signify different things, like love, truth, peace, justice, and continuity.
The bread itself is similar to brioche but does not use butter, and uses oil instead. It is lightly sweet, tender and made to be shared. It’s also popular for use in things like French toast like brioche is as well.
Baking Tips & Notes
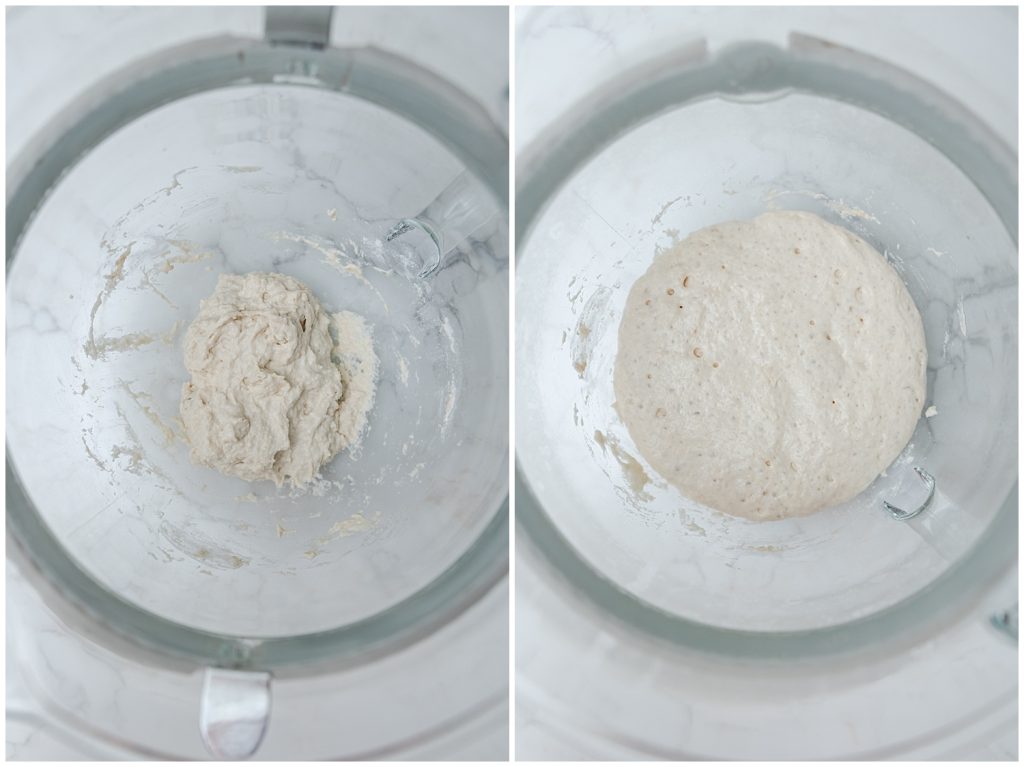
The challah starts with a poolish. If you make a lot of yeast breads you may not be familiar with this technique, but really it’s a simple way to elevate the flavor and texture of your bread. More time when proofing gives bread more flavor and it will also help the crumb of the loaves to be a little softer.
The wow factor in braided challah is two fold: the taste and the design. When you’re shaping the dough into ropes, you want the dough to be slightly tacky. The tackiness helps create tension which allows you to roll out the dough easier, so don’t flour your work space when you take the dough out of the bowl.
However, when you’re braiding your challah, you do want to use a little flour. You don’t want the strands to melt into each other, so that the braid is well defined. After rolling out all my strands, I then coat my hands in flour and run them along each rope so they are lightly covered. Then I start my braiding. You can leave the ends uncoated so the dough will stick to itself at the beginning and ends. Braiding the dough is really where you can let your creativity shine. I have two examples in my process shots of different braids but there are SO MANY ways to braid challah and you can use whatever style you prefer.
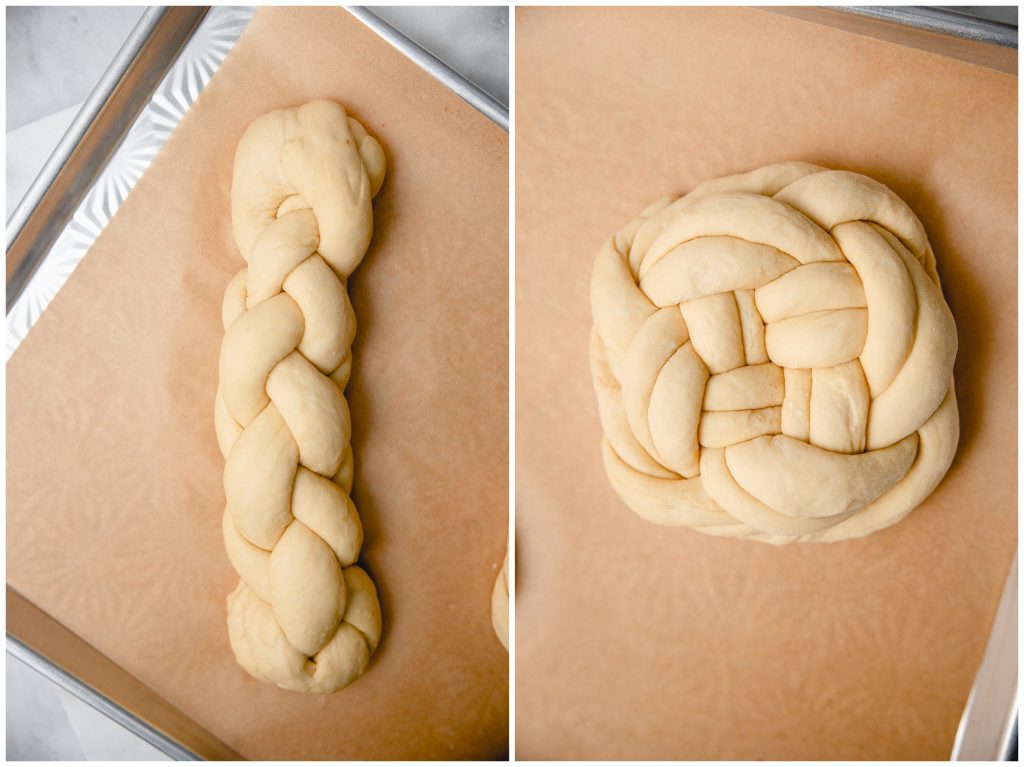
For the four strand braided challah you are going to repeat the same pattern. Start by joining the four strands together at the top and pinching together. Looking at the strands, left to right if they are 1-2-3-4, you will lift 1 over 2, under 3, over 4, and place it down so it now becomes the number 4 strand. Then you repeat that until you get to the end, and pinch together the ends. Then tuck both of the ends underneath the braid.
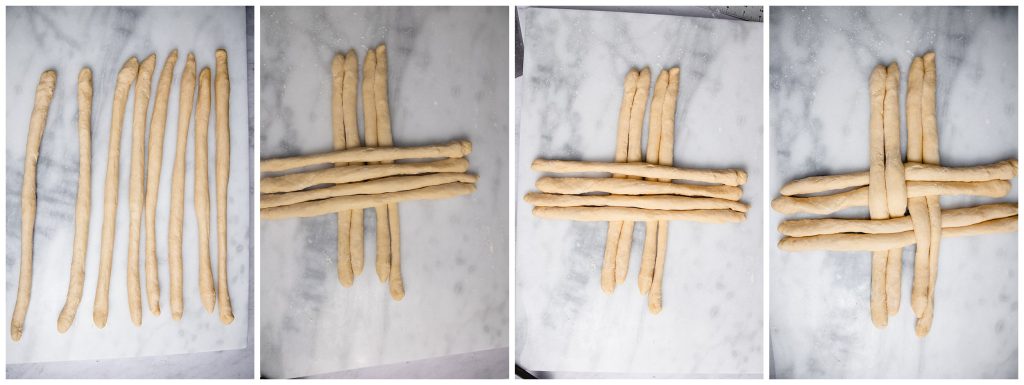
For the eight strand braided challah you will place four of the strands vertically, and the other four going horizontally. They are sort of woven together as you can see in the photo.
To begin you take the two strands that I call the “under strands” as they are underneath strands going across them – so looking at the photo, the top vertical two strands on the right side would cross over the next vertical set to the left, and be laid down next to the horizontal strands. Then you would take the middle horizontal strand (now that there are three on that side) and cross it over the one to the left and lay it down so it’s vertical. You would do this two more times so that each side has had one strand crossed over.
Next you would take the top vertical strand that you crossed over to begin with, and cross it over the closest strand to the right – the opposite direction of the first round of crossing – making a sort of x shape. Then you would continue around with the next 3 doing the same. Each time you have done it four times, you go back around crossing the opposite direction until the strands are done (usually you can only do this about three times total). Then pinch and fold the ends under the loaf.
Here is a link to a youtube video (not my video) I have found helpful in several different ways to braid the dough: 8 Ways to Braid Challah
I developed this challah recipe using both bread flour and all purpose. Bread flour will give the dough more elasticity and strength allowing it to rise a little more. All purpose lends itself to soft bread. Since challah is both, I used bread flour in the poolish and all purpose for the remainder.
This recipe is for two braided challah loaves but honestly, if you wanted to make a very large single loaf you could. However, I think making two makes this more manageable, and I wanted this recipe to make two loaves as traditionally, Jewish meals will have two. If you only need one, you can halve the recipe, or make two and freeze the second. Let it come completely to room temperature, then place in a freezer bag, removing as much air as possible and place in the freezer. It should keep up to 3 months.
A key to getting your braid to remain beautiful in the oven, is allowing your second proof to be long enough. If it’s not you might get some ripping of the dough. The bread will taste perfectly fine, but the braid won’t be quite as picturesque. Allow your second proof to be just a little bit longer than you might let something like dinner rolls proof.
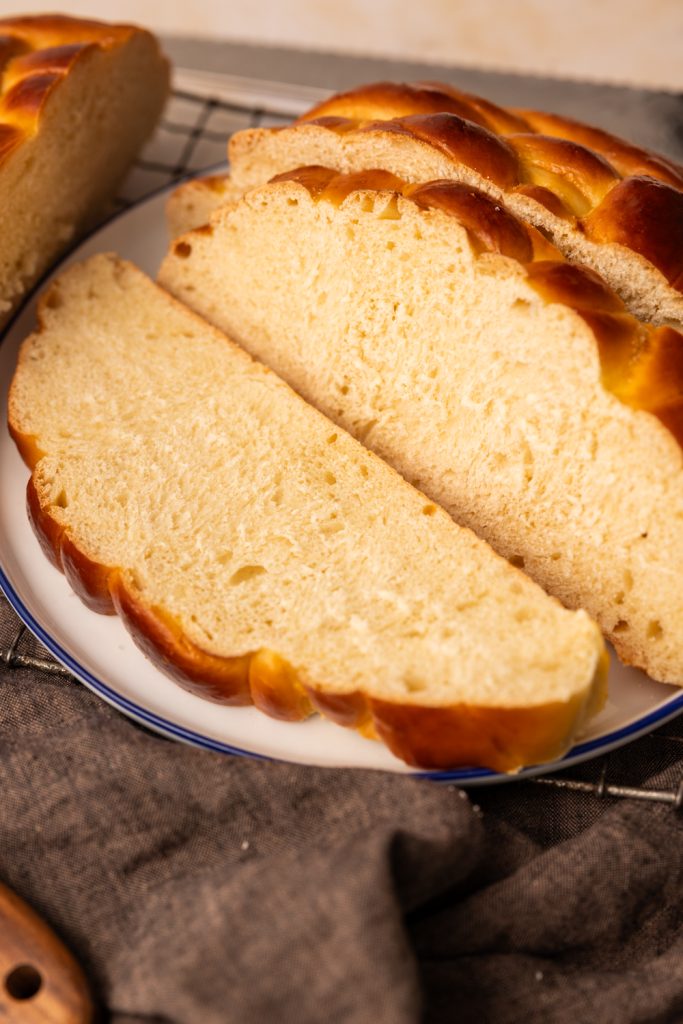
Finally, you want your challah to be a rich deep golden brown rather than a light golden. This will insure the bread is fully baked. Additionally, you want an internal thermometer to read at least 190F.
Braided Challah Key Ingredients
- Eggs – How many eggs to use in this braided challah was something that I spent a bit of time researching. It’s not a cut and dry answer. Some people use smaller amounts, some only use egg yolks, some even use close to a dozen egg yolks. I decided to keep the egg amount lower as when I have made it before and had other versions, they weren’t particularly eggy and I enjoyed them.
- Oil – Because challah doesn’t use dairy, oil is used in lieu of butter to enrich the dough.
- Honey – Another contested ingredient in challah is honey. Not so much the use of it, but how much. There is also no standard sweetness level so I decided to go with sweetened but not sweet. I chose to use a combination of honey and granulated sugar. They honey adds sweetness but also flavor so I didn’t want to use only sugar.

Ingredients
Poolish
- 120 g Bread flour 1 cup
- 120 g Warm water ½ cup, ~105°F
- 7 g Instant yeast 2¼ tsp
Dough
- 450 g AP flour 3¾ cup
- 1 tbsp Sea salt
- 80 g Warm Water ⅓ cup, ~105°F
- 2 large Eggs room temperature
- 50 g Vegetable or Canola oil ¼ cup
- 25 g Granulated sugar 2 tbsp
- 42 g Honey 2 tbsp
- 1 large Egg beaten
Instructions
- In the bowl of your stand mixer, add water, bread flour and yeast and whisk together. The poolish will be very wet and sticky. Cover and allow to sit for 1 hour on the counter.120 g Bread flour | 120 g Warm water | 7 g Instant yeast
- When your poolish is ready, it will be very bubbly on the surface. Add the rest of your ingredients to the poolish and mix with dough hook attached until the dough is smooth and tacky. (10-20 minutes)450 g AP flour | 1 tbsp Sea salt | 80 g Warm Water | 2 large Eggs | 50 g Vegetable or Canola oil | 25 g Granulated sugar | 42 g Honey
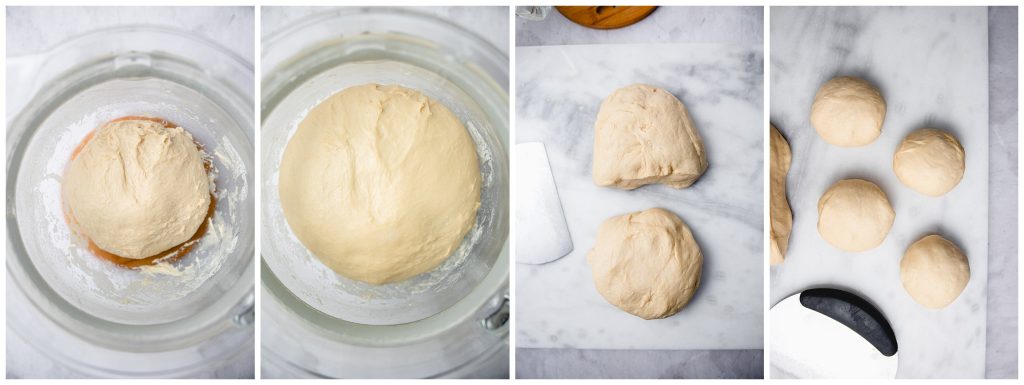
- Flour your hands, remove the dough from the bowl and shape into a ball.
- Lightly grease your mixing bowl and return the dough to the bowl. Cover and let rise in a warm spot for 1-2 hours or until dough has doubled in size.
- Punch down the dough and divide it into two pieces. Weighing your dough can help you get two equal pieces but it's perfectly fine to eyeball it. Cover the piece of dough you aren't working with first.
- Divide the dough. How you divide the dough will depend on how you intend to braid the dough. I have notes, photos, video and links to additional videos on different ways to braid the challah, but in this recipe card I will be describing a 4 strand braid. Divide your dough into 4 equal portions.
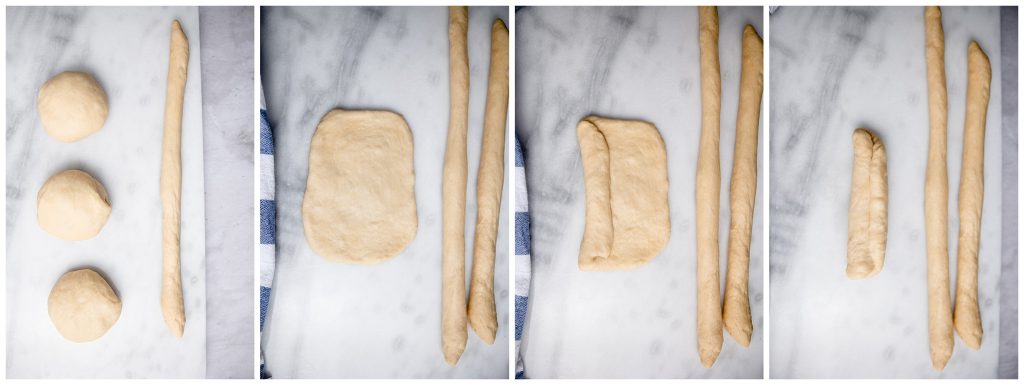
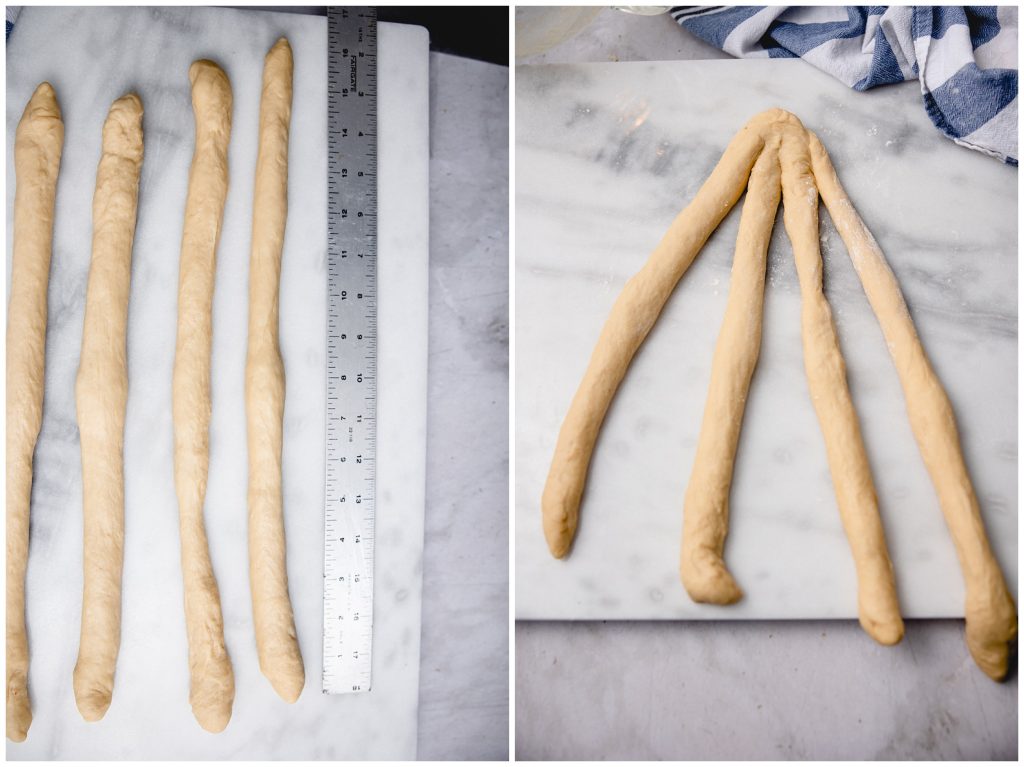
- Flatten each piece of dough and fold over on the long side until you have a tube of dough. Using your palms, roll the dough against the work space with your hands moving outwards to create a ropelike strand with tapered ends. Each strand should be at least 12 inches and about ¾ inch wide. Set to the side.
- Repeat this process with each portion of dough, creating 4 strands.
- Place all four strands in front of you vertically about an inch apart from each other. Join the four strands together at the top by pinching the dough pieces together.
- The strands should now sort of look like a fork. From left to right the strands are 1-2-3-4. Take strand 1 and cross it over strand 2, under strand 3, and over strand 4, laying it down to the right of strand 4. Strand 1 is now strand 4.
- Continue repeating this same exact pattern until the braid is no longer long enough to braid but still has 2 inches or so free at the bottom.
- Pinch all the ends together at the bottom just like you did to begin the braid at the top.
- Tuck both of the pinched ends underneath the braid, and place your challah on a parchment sheet.
- Repeat the process with the second portion of dough.
- Cover the baking sheet with a tea towel or greased sheet of plastic wrap and allow to proof in a warm area. Challah will often benefit from a much longer second proof than many breads. Make sure the bread has considerably puffed up in size, even if it takes more than an hour.
- While your bread proofs, preheat your oven to 350°F.
- When the challah is ready for the oven, brush it with the beaten egg, then place it in the oven on your middle rack.1 large Egg
- Bake for 30 minutes or until the crust is a deep, rich brown. Remove from the oven and transfer to a wire rack to cool. Wait until the bread has cooled completely before cutting into it. Store in an airtight container for up to 3-5 days. Enjoy!
This was the best introduction to challah bread! It was perfectly cooked, the directions were great and frankly it was incredibly addicting. The middle was exceptional. I would love to eat this every day but that could be considered excessive… I might choose to be excessive. Overall 10/10, no notes.
I grew up eating homemade Challah bread, and this one gave me all the good feels of childhood memories. It also freezes well if you want to savor it and not eat it all at once (although good luck with that). It’s the perfect amount of sweet, the texture was spot-on, and I enjoyed it very much!