
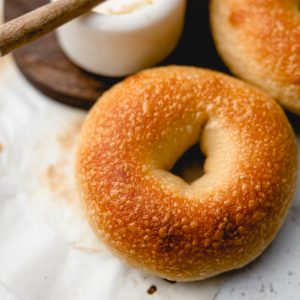
NY Style Bagels

I don’t know where you live, but have you ever lived if you haven’t had real NY style bagels? I think the answer may be no. You might have a fantastic bagel shop in your town. But how do you know how they rank unless you have eaten the gold standard? Maybe ignorance (in the kindest sense of the word) is bliss. I present you the only bagel recipe you’ll need, NY style bagels.
I’m not a New Yorker, but I do live next door in Connecticut. I also have family members who live in the city. I grew up being sent H&H bagels for Christmas morning and honestly I may have looked forward to the salt bagels more than the presents. Maybe not but today? 100%. New Yorkers will tell you their bagels and pizza are superior because of their water. I don’t know if that’s the case but they are delicious, the perfect amount of chew. You don’t want a bagel that’s too soft, or too bready. It needs to have that crust and a dense interior.
What are NY Style Bagels?
NY style bagels are not the first or only kind of bagels in the world. There are many types made around the world with similarities but also with key differences. Montreal style bagels are thinner, poached in honey water and wood-fired. Chicago style are often sourdough, but otherwise similar to NY. Bialys are a Polish baked good that looks similar to a bagel, but only has a center divot (no hole) and is not boiled. Bagels are also popular in middle eastern countries with the Jerusalem bagel being one of the most popular. It is thinner, more oval shaped and often sweeter than our traditional bagel.
NY Style bagels get that signature chew, shine and flavor by a few things but one is the use of barley malt (or non-diastatic malt powder). Boiling the bagels gelatinizes the starches and kills the yeast preventing much additional rise in the oven. The barley malt adds a tiny bit of sweetness, and helps with the Maillard reaction which is when your baked goods get that beautiful browning on the exterior. Without boiling the bagels, you essentially just have bread shaped like a bagel. It might have a crust immediately leaving the oven but will end up quite soft. No good for a bagel.
Baking Tips
My recipe for a 24-36 hour cold proof. Do you have to do this? On this recipe, yes. If you would like a non-overnight recipe, I have recipes on this site, see Spicy Garlic & Onion Bagels, Pretzel Bagels that don’t require this step. However, after comparing a batch that has been cold proofed to one that hasn’t.. if you want that real NY style bagels appearance, and you have to do the cold proof. Otherwise, you just don’t have the same crust or chew.
Don’t confuse diastatic malt for non-diastatic malt. They are different ingredients with different functions. Diastatic (what we DON’T want) is made from barley as well but the enzymes within the barley are still active, which helps boost rise. Non-diastatic malt does NOT have active enzymes, and does not help with rise but enhances flavor. It helps create the signature flavor of NY style bagels. It also helps with browning.
Boil in small batches and set a timer. I like to boil the bagels in batches of 3 or 4. You don’t want to crowd them but this also makes it easier to know which bagels went in first, middle and last and flip them right when they need to be. How long you boil bagels for will have an effect on their crust. Personally I find about 30-45 seconds on each side is the sweet spot.
I would recommend cutting your parchment into squares and placing each bagel on it’s own square. The dough tends to stick to the parchment after the long cold proof, so you can easily transfer these to the water with the paper on them, and peel it off once it’s wet without deflating the bagel. Also, semolina flour/cornmeal could be sprinkled on the parchment to help with this as well.
When your bagels are proofing, make sure the pan is covered well. I would not recommend aluminum foil. My favorite way to cover things like bagels or cookie dough is this pan set: Half sheet pan with lid.
Another benefit of the cold proof is that you can have bagels first thing in the morning depending on your timing. The kneading, first proof, and shaping is done the day before, just boil and bake!
This recipe makes 8 large bakery size ny style bagels, but if you want smaller bagels you could divide the dough into 10-12 portions instead of 8. They can be made plain or topped with almost anything your heart desires.
Also, these bagels will be hard when they come out of the oven, but soften as they cool off. It’s best to wait until they have completely cooled before enjoying.
NY Style Bagels Key Ingredients
- High Gluten Flour – Bread flour is great but there are even higher protein flours like this High Gluten Flour from King Arthur which has 14% protein vs their bread flour which has 12.7%. Regular bread flour will work perfectly if you don’t want to spring for such a specialized flour though. This recipe is really not the recipe to substitute all purpose flour. If there is any recipe I say get the higher protein flour for, it’s this one. The texture of the bagel is one of the main differentiators that will make or break your NY bagel experience.
- Non Diastatic Malt Powder – You want to make sure you get NON diastatic malt powder, and not diastatic malt powder which has a different function. I personally get mine from King Arthur but you can find it on Amazon and specialty food stores.
This page contains affiliate links for products I use and love. If you choose to purchase directly from clicking a link, I may earn a small commission, however I am not being paid to link to these items.
Ingredients
- 600 g High gluten or bread flour 5 cups
- 12 g Sea salt 2 tsp
- 4 g Instant yeast 1¼ tsp
- 12 g Non diastatic malt powder 1 tbsp
- 360 g Water warm, 1½ cups
Water Bath
- 1920 g Water 8 cups
- 25 g Non Diastatic malt powder 2 tbsp
- 12 g Dark brown sugar 1 tbsp
Instructions
- Add flour, salt, yeast, non-diastatic malt and water to bowl of stand mixer with dough hook attached. Mix on low until dough is elastic and strong, no longer sticking to the sides of the bowl. 10-20 minutes.
- Let the dough sit in for about 10 minutes, then remove the dough from the bowl to your workspace.
- Line a baking sheet with parchment or a silicone mat. Additionally, this is optional but I find helpful – Cut parchment into 8 squares that are 4-5 inches large, one for each bagel.
- Divide the dough into 8 equal portions for good size bagels or 10-12 for smaller bagels. Weighing your dough will help create perfectly equally sized bagels but is not required.
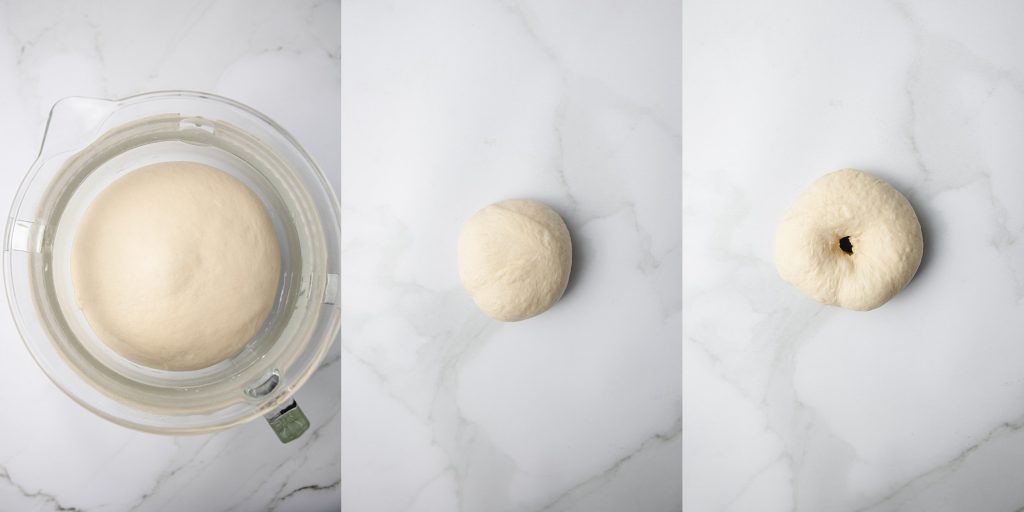
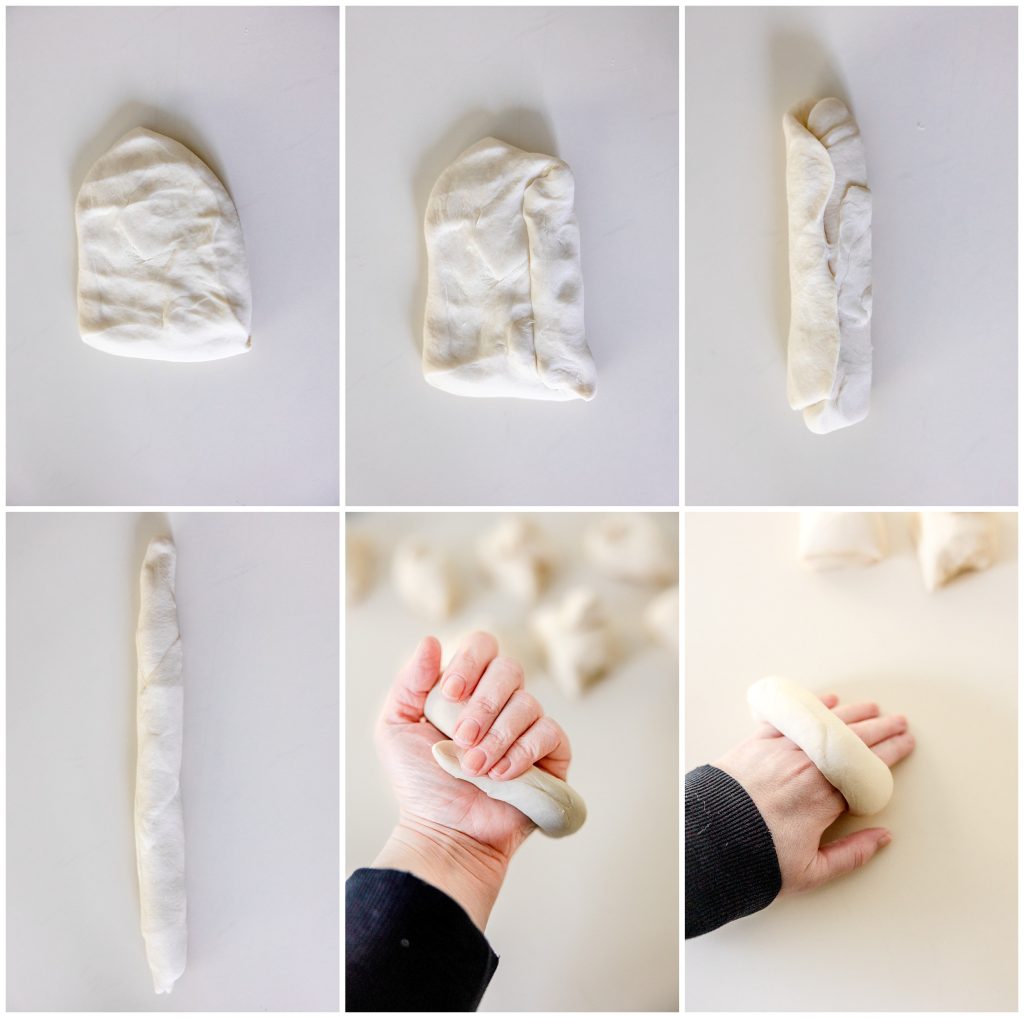
- Shaping the bagels: There are two ways to shape bagels and you can do either with the same results.Method 1: Take a portion of dough and flatten into a rectangle-ish shape. It doesn't need to be perfect. Take the long side and fold it over onto itself – not all the way to the edge but about a third – and then continue to do that to create a rope/log. Using your palms, roll out the dough to a rope shape that's about 8-10 inches long. Place one end of the dough in the middle of your palm and wrap the rest around your hand, overlapping the ends on your palm side creating a ring that your hand is in the center of. Place your palm and the ends down onto the workspace and push your hand forwards and backwards, the dough should begin to roll together and seal the seam where the two ends meet, creating the ring bagel shape. Place on your baking sheet (on a parchment square if using them) and repeat with all the remaining dough portions.Method 2: Shape your dough portion into a ball. Poke your index finger through the center, meeting your thumb on the other side to create a hole. Stretch the dough from the center hole. I find it easiest to put both pointer fingers in facing each other and make a circular motion (like if you were telling someone to hurry up) until the dough has been stretched and the hole is several inches wide. Place on your baking sheet (on parchment squares if using them) and repeat with all remaining pieces of dough.
- Cover your baking sheet and let the bagels rise in a warm spot for 30-60 minutes.
- After 30-60 minutes, place your covered baking sheet in the refrigerator to rise for 24-36 hours.
- The next day, when ready to bake bagels: Preheat your oven to 425°F.
- Remove your bagels from the refrigerator and allow to sit for 30-60 minutes. If it is winter or your house is cold, this time may increase. When I tested this in a cold winter house, it took about 45-60 minutes before my bagels passed the float test.
- Fill a wide, deep pot with 8 cups of water. Sprinkle the non-diastatic malt and brown sugar into the pot and whisk. Bring the water to a low boil.
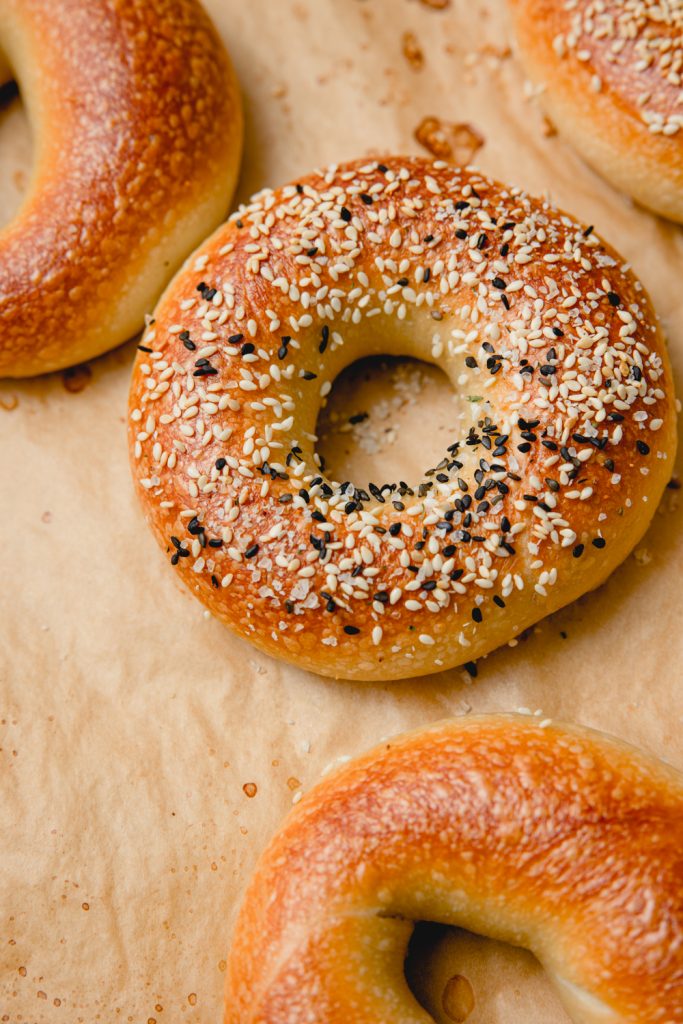
- Test one bagel to make sure it's ready – place in the water and if it floats it's ready. If not, let the bagels rest for another 20-30 minutes. If a bagel doesn't pass the float test, you still can continue boiling and then bake the single bagel. It will be edible just more dense than the bagels that are ready.When your bagels are ready, place them in the water and boil for 30-40 seconds on the first side then flip them over and 30-40 seconds on the other side. Don't worry about peeling the parchment squares off. After about 5-10 seconds they will lift off easily without deflating your bagels. Remove using a spider or slotted spoon or spatula back onto the baking sheet. If you would like plain bagels, leave as is. If you want toppings such as everything, sesame or poppyseed, add toppings after you have added the next batch of bagels to the water. Because the bagels are still tacky from the water, it will adhere without having to use anything additional like egg wash.
- Repeat the process with the remaining bagels.
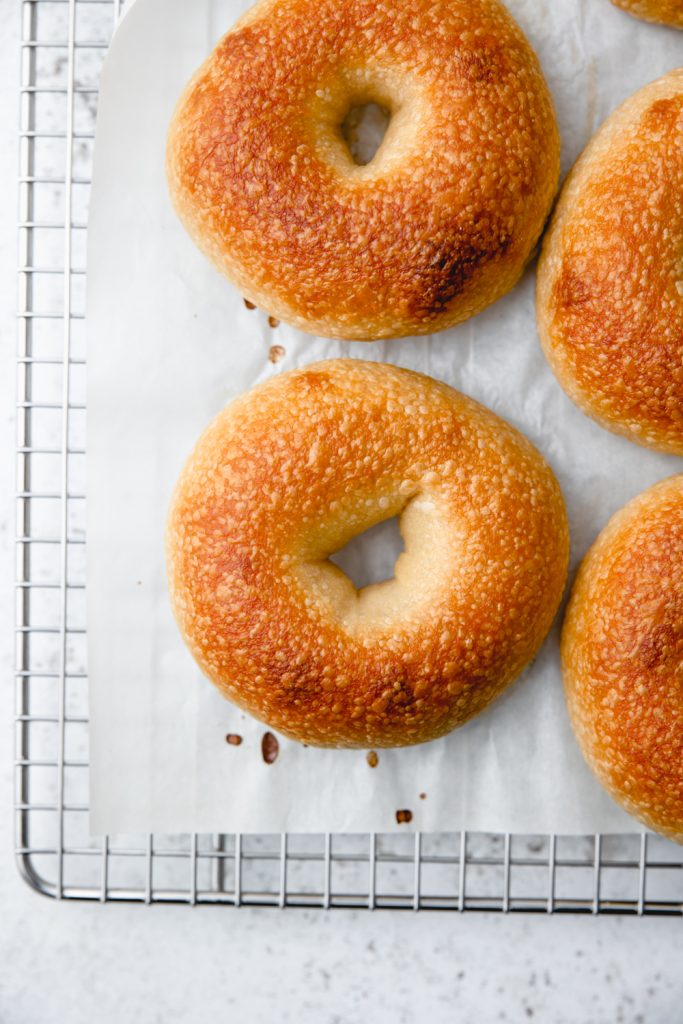
- Once all bagels have been boiled, move the pan into the oven on the center rack and bake for about 17-22 minutes or until the bagels are done. Bagels will be ready and lightly golden at 16-17 minutes and you can remove them, or you can let them stay in the oven and get a rich golden color. The level of browning is personal preference – Personally I like them around the 19 minute mark.
- Remove from oven and onto a wire cooling rack to cool. Allow bagels to rest for at least 30 minutes before consuming. Store them in an airtight container for up to 4-5 days. Enjoy!


One Comment