


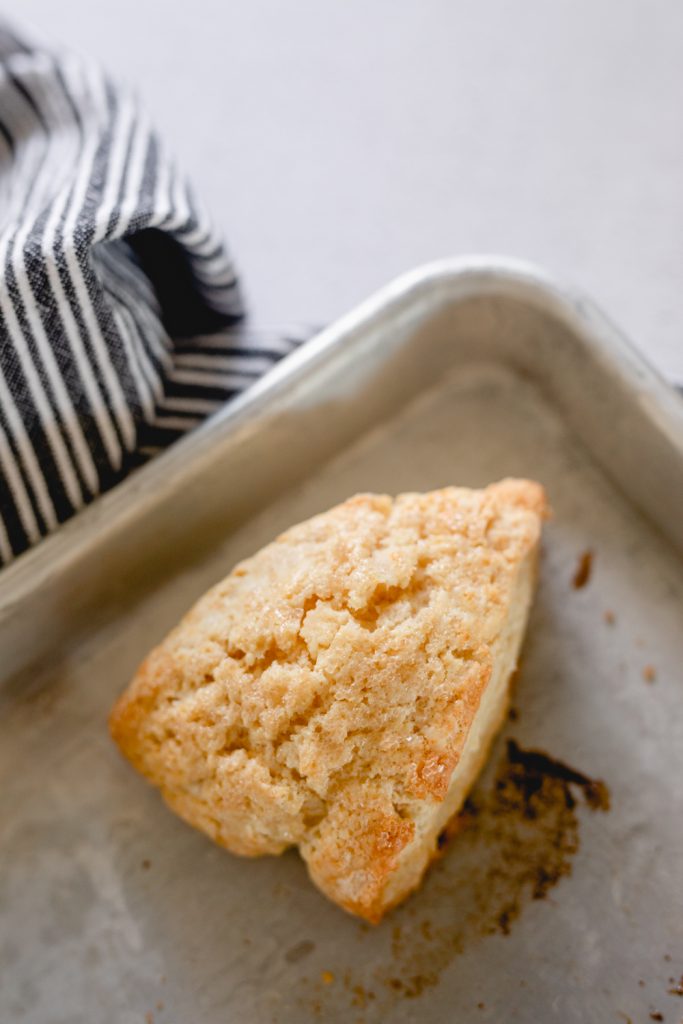
Vanilla cream scones are probably what started this blog. When it comes to scones, I am very picky. I think anyone who loves scones, and who has had an actual good one is too. Once you have had a good one, nothing else compares or will do. Spoiler alert, the ones at Starbucks.. not good. I’m sorry Starbucks, some of your treats are just fine but not the scones. So, I spent A LOT of time working on and tweaking this recipe. I probably tested it about 50 times. Changing the amount of butter or flour or cream, sometimes by a little, sometimes by a lot. Trying to see what created the best texture, rise, and flavor.
What is a Scone?
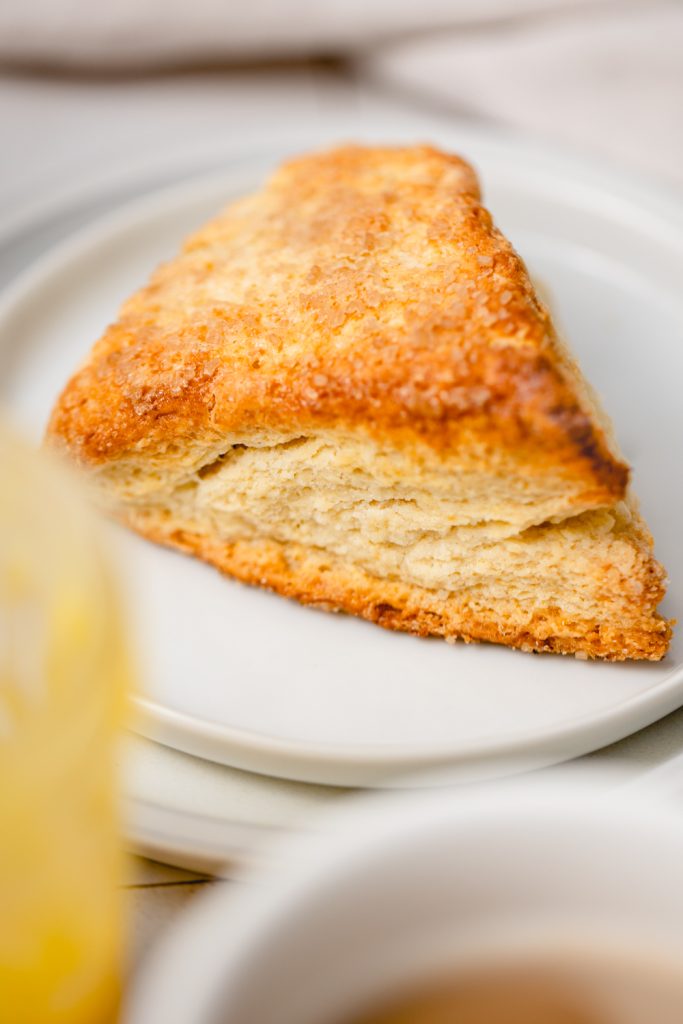
The definition is going to vary depending on where you have had one but for Americans (which I am), it’s sort of like a sweet biscuit. Not the doughy/flaky pull apart layers type but the buttermilk drop biscuit style. There are layers though, which you will see in the finished product.
To me, a good scone isn’t overly sweet, or overly dry. It’s kind of the texture of if a muffin and a biscuit had a baby. Buttery, a little flaky and crumbly, a little bit sweet. It’s not too sweet, you want to be able to taste the buttery component but without sugar it more or less becomes a biscuit.
There are a lot of variations on how to make them: butter only, cream only, milk instead of cream, etc. My scones use both cream and butter, as well as an egg to help prevent it from being too crumbly.
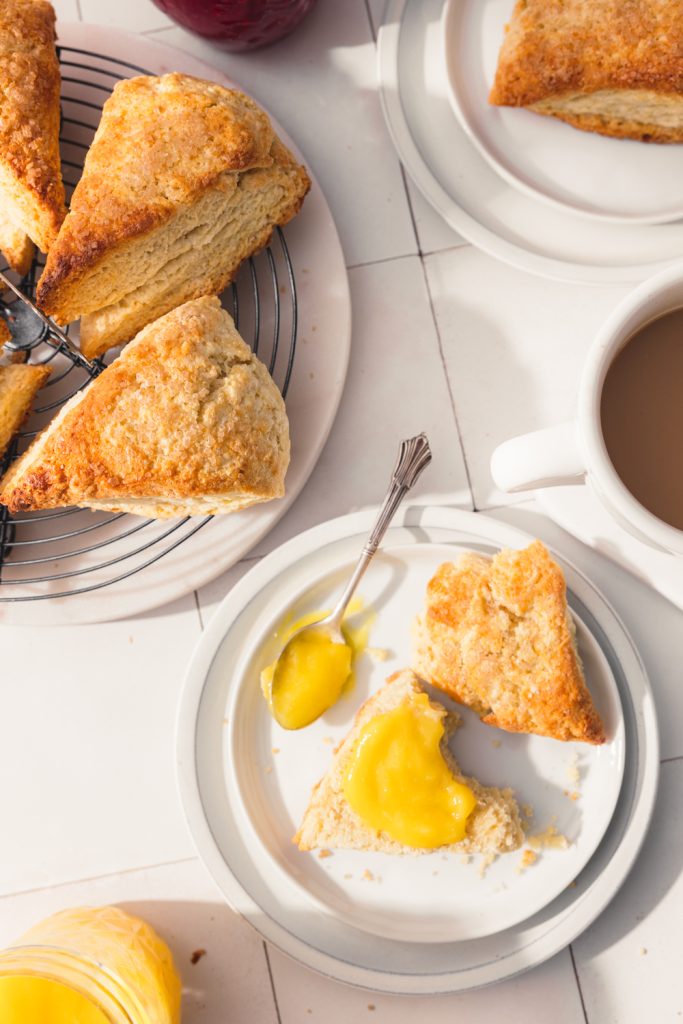
Now, while these vanilla cream scones are delicious on their own, I fully recommend topping them with jam, or curd, or a glaze. I’d recommend my Lemon Curd, it’s my favorite to enjoy with these.
Scones Zone – Tips for Success
- Cold. Cold. Cold!
Premeasuring all your ingredients and having everything ready is a big key to success when making scones. You want everything to stay cold, to help the butter stay cold. When the butter melts in the oven it creates steam which creates lift and rise in the scones. It makes sure your scones go up and don’t spread out.
Keep everything as cold as possible. I often measure my cream, and put it back in the fridge. Beat the egg, back in the fridge. It allows me to work quickly and keep everything chilled. I don’t preheat my oven, but place the scones in the freezer while it does. This lets the butter cool back down after having been worked. - Use a grater
You can use a pastry cutter or knives to cut in your butter, but for me a coarse cheese grater works best. You get flattened small pieces of butter throughout your dough. Plus, when you freeze the butter it is easier to grate. - Use the good stuff.
If you can find local heavy cream, it probably tastes better than mass produced. Use that. Use the good butter with higher milk fat content. These small things produce just much better tasting scones.

If you bake these vanilla cream scones and love them and want to try another version (or you want to try something with a different flavor profile) I’d recommend:
- Cinnamon Cream Cheese Scones w/Brown Butter Glaze
- Colorful Birthday Cake Scones
- Rich Chocolate Orange Scones
Baking Tips/FAQ
Can I freeze scones? Yes you can! It’s easiest to freeze scones before baking them. I usually put them on a baking tray in the freezer, cut and separated (do not put cream and turbinado sugar on top of the vanilla cream scones) and freeze them for about an hour. At that point they will be pretty much frozen solid, then transfer them to a freezer bag. They will keep for about 6 months and you can bake one at a time or all of them when you’re ready.
When you’re ready to bake, I’d take them out of the freezer and then preheat your oven. Normally you start the oven at a much higher temp and reduce but because they are frozen this can result in the bottoms getting a little overdone. Instead, just heat up the oven to 350 and bake for about 25 minutes.
You can also bake your scones and then freeze them. After baking, allow them to come completely to room temperature and then place on a baking sheet into the freezer for an hour. Then transfer to a freezer bag. To defrost them, I would either place them in the fridge overnight to let them defrost, or allow them to come to room temperature on the counter for 60-90 minutes. You could also pop them in the microwave on defrost for probably about 2 minutes. Then wrap them in aluminum foil and place them in the oven or air fryer at 325 for about 7-10 minutes.
Can I substitute milk for cream? Can you do it? Yes. Will this recipe be close to the same? No. Unfortunately heavy cream is going to lend to a richness that milk just cannot. Heavy cream has at least 36% fat content, while whole milk is about 3.25%. That is a HUGE difference, which will affect the texture and the flavor dramatically. After all, these are called Vanilla CREAM scones.
How long will these last? These vanilla cream scones are best eaten pretty much right out of the oven. Let them cool a little bit, but then enjoy them. Same day is best, next day is still pretty good. After that, while they might still be perfectly fine in the sense they aren’t moldy or stale, they just don’t taste as great.
Vanilla Cream Scones Key Ingredients
- Butter – Butter is one of the key flavors so, if you can afford the top shelf butter, get it. I like to buy European butter with higher butterfat percentage but even just a good brand like Tillamook is also great.
- Heavy Cream – Just like with the butter. The good stuff. Better cream = better scones. If I can find local cream, I always buy that. It’s always amazingly rich and delicious.
- Turbinado/Demerara sugar – These sugars are minimally processed with large granules that will not melt when baked. I love the slight amount of sweetness and crunch that this adds to the top of the scones. It allows them to be enjoyed thoroughly without any glazes or toppings.

Ingredients
- 300 g AP Flour
- 50 g Granulated sugar ¼ cup
- ½ tsp Sea salt
- 2 tsp Baking powder
- ¼ tsp Baking soda
- 113 g Unsalted butter ½ cup, cold
- ⅔ cup Heavy cream cold, plus a few extra tbsp
- 1 large Egg cold
- 1 ½ tsp Vanilla extract
- Demerara or turbinado sugar for sprinkling
Instructions
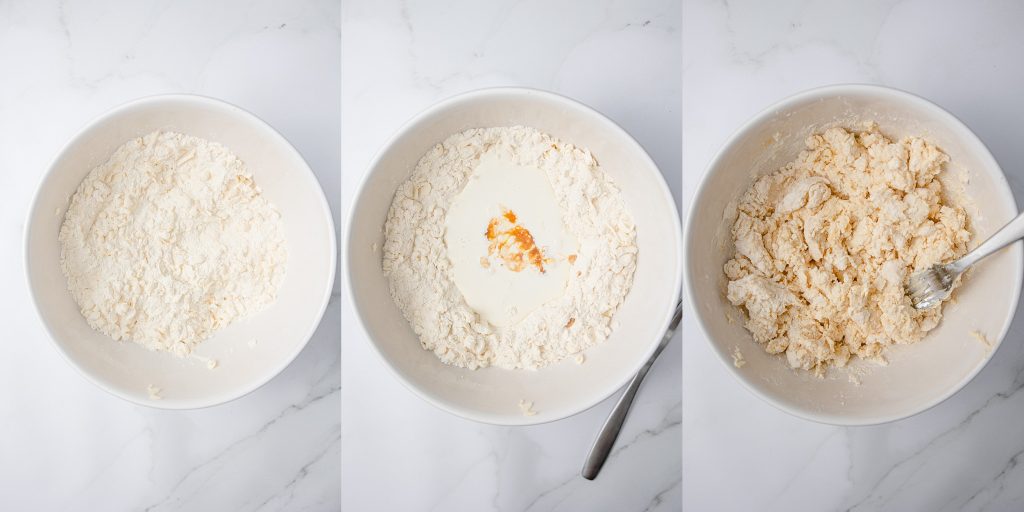
- Place butter in freezer for about 20 minutes. Preheat oven to 425°F, and line baking sheet with parchment. Mix together flour, baking soda, baking powder, sugar and salt in a mixing bowl.
- Use a cheese grater to grate the semi frozen butter into flour. After you have grated about half the stick, use a fork to fluff the pieces of butter into the flour mixture, coating them with flour. Finish grating butter and repeat.
- Beat/whisk cold egg in a small bowl or cup, add vanilla to beaten egg.
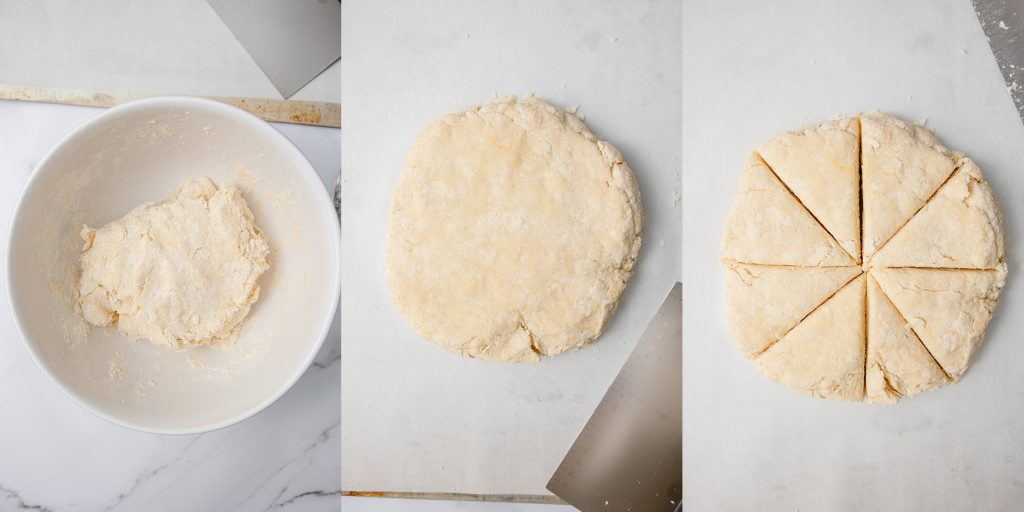
- Create a well in the center of the flour and butter mixture, and pour egg mixture plus ⅔ cup cold heavy cream into the well. Use a fork to begin to incorporate the dry ingredients into the wet. Use the fork until dough has mostly come together. There might be some dry bits at the bottom, this is okay. Either use your hands, or a bowl scraper to bring the dough more together, folding it over on itself a few times and incorporating the dry bits of flour into the folds.
- Turn dough out onto lightly floured surface and pat out into a circle or square, dough being roughly 1 inch thick. It’s fine if the dough is thicker, erring on the side of too thick vs too thin is better. Lightly flour a knife or bench scraper. Cut the dough into equal quarters, and then half each quarter. When cutting, cut straight down then pull straight back up, do not drag cutting utensil through the dough.
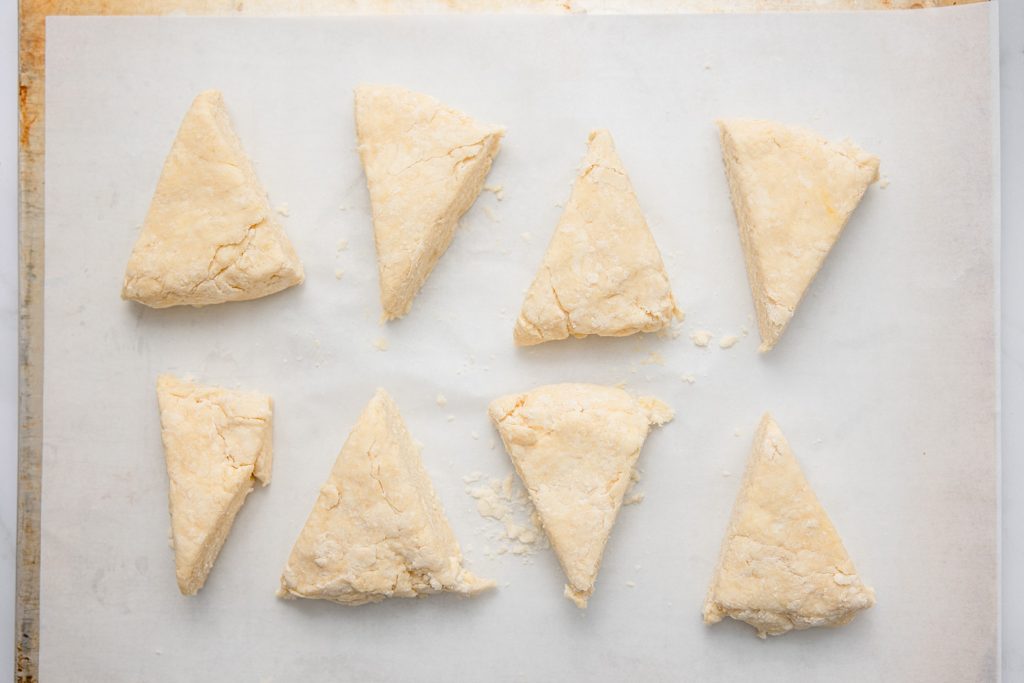
- Transfer dough to parchment or silpat lined baking sheet, placing scones about 1 inch apart. Placing them close together allows them to get a little more rise. You can place them closer, however they may bake into each other. If you are working in a particularly warm kitchen, (or even if you aren't), place the scones in the freezer for about 10-20 minutes before baking. You want the butter in the scones to be cold when placed in the oven so that they create steam and give your scones rise instead of spreading out.
- Just before baking, brush the top of each scone with heavy cream, and sprinkle with demerara sugar. Place in the oven, reduce the temp to 375°F and bake for about 25 minutes, or until the tops are lightly golden brown.
- Scones are best eaten the first day, when warm. To reheat, place scone inside aluminum foil and reheat in oven, air fryer or toaster oven at 350 for about 6-8 minutes.
Notes
- If you don’t have or are leaving off the demerara/turbinado sugar, I would probably up the sugar in the dough from 1/4 to 1/3 cup, to add a tiny bit more sweetness that you get from the sugar top.
- The amount of cream in the recipe can vary depending on how dry your environment is. I usually start with 2/3 cup and add 1-2 extra tbsp if the dough needs it that day. You don’t want the dough to be wet, but you also don’t want it falling apart before baking.
- To prepare ahead of time, freeze scones the night before. Put in a freezer bag after the scones have frozen (maybe an hour or so). When you are ready to bake them, take them out of the freezer while your oven preheats. Brush the cream and sprinkle sugar on top before baking, not before freezing. Frozen scones may take slightly longer to bake, and the bottoms will brown more.

Pingback:Strawberry White Chocolate Chunk Scones -
Could you make up the dough the night before, refrigerate it and then bake in the morning?
Hi Vanessa! You totally could do that, however I’d recommend freezing vs refrigerating. Maybe after an hour or so in the freezer just put them in like a freezer bag so they don’t get any ice on them, and then just take them out while you preheat the oven and brush the cream and sprinkle the sugar on top right before baking. They may take a few extra minutes to bake this way, it’s been a while since I’ve baked them from frozen but I know this is definitely the best way to set them up for morning.
Pingback:Cookie Butter Scones
Pingback:Carrot Cake Scones
Pingback:Birthday Cake Scones -
Pingback:Cinnamon Cream Cheese Scones w/Brown Butter Glaze
Pingback:Buttermilk Biscuits
Pingback:Sweet Potato & Cardamom Scones
Pingback:Lemon Curd
Pingback:Best Blueberry Scone Loaf › Bread Baking Babe